Self Watering Planters Diagram Gardening enthusiasts and beginners alike have long been looking for solutions that make plant care easier and more efficient. One such innovation is the self-watering planter, which takes the hassle out of regular watering routines while ensuring your plants receive the optimal amount of moisture they need to thrive.
In this article, Garden 02 will dive deep into self-watering planters, explore how they work through an informative diagram, and why you should consider using one for your indoor or outdoor garden.
Table of Contents
Toggle1. What is a Self-Watering Planter?
A self-watering planter is a specially designed container with a built-in reservoir system that allows plants to draw water as needed. These planters help maintain consistent soil moisture levels, ensuring that your plants neither dry out nor drown in excessive water. This makes self-watering planters especially valuable for individuals who may not have the time to water plants daily or for those who travel frequently and want to keep their garden healthy while they are away.
The core idea behind self-watering planters is to separate the water source from the plant’s root zone. The plant roots then absorb moisture through capillary action from the reservoir.
2. Understanding the Self-Watering Planter Diagram
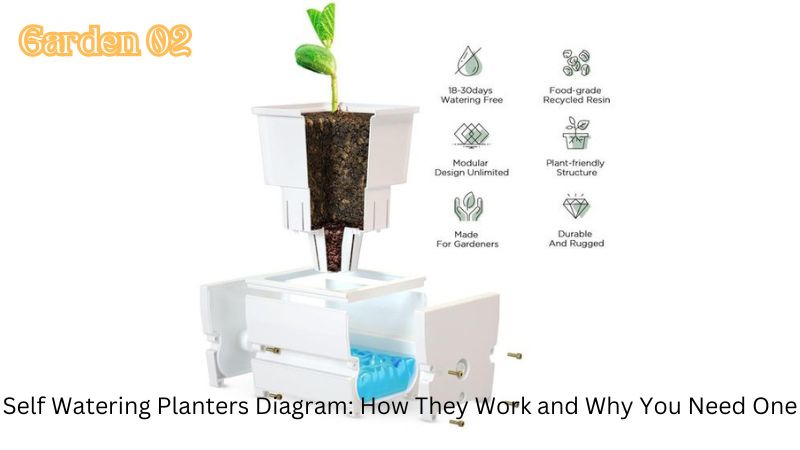
To better understand how self-watering planters work, let’s break down the typical components of a self-watering planter by looking at a diagram:
Components of a Self-Watering Planter
- Water Reservoir: The reservoir is located at the bottom of the planter. It stores water and provides a source of moisture for the plant over time. The size of the reservoir may vary depending on the planter’s design, but its purpose is to hold enough water for several days.
- Wicking Mechanism: This mechanism is often a material or structure that allows water to be drawn from the reservoir into the soil. This can be made from cotton, felt, or synthetic wicking material, which draws water upward through capillary action. Some planters may have soil directly in contact with the water, allowing for the same wicking effect.
- Planting Zone: The top portion of the self-watering planter where the plants and soil are placed. The soil here should be well-draining to allow the roots to breathe while absorbing moisture from below.
- Overflow Drain: Most self-watering planters include an overflow drain to prevent the reservoir from flooding. This ensures that excess water drains out if you accidentally add too much water to the reservoir. The overflow drain keeps the water level optimal, preventing root rot.
- Water Fill Tube: A tube or funnel is often included to make it easy to refill the reservoir. It allows you to water your plants directly into the reservoir without disturbing the soil or causing overwatering from above.
- Indicator (Optional): Some self-watering planters come with a water level indicator to show how much water is left in the reservoir, so you’ll know when it needs to be refilled. This is particularly helpful for busy gardeners who want to avoid guessing how much water is left.
Diagram Explanation
In a typical self-watering planter diagram, you would see a cross-sectional view of the container. The diagram would show:
- The reservoir at the bottom, filled with water.
- A wicking material leading from the water reservoir into the planting zone, where the roots can access moisture.
- The soil and plant placed above the reservoir, separated from the water by a barrier or screen to prevent direct contact between the roots and water.
- An overflow drain to let out excess water.
- The water fill tube for easy refilling of the reservoir.
This design ensures the plant takes up water gradually, reducing the risk of overwatering and helping with water conservation.
3. How Does a Self-Watering Planter Work?
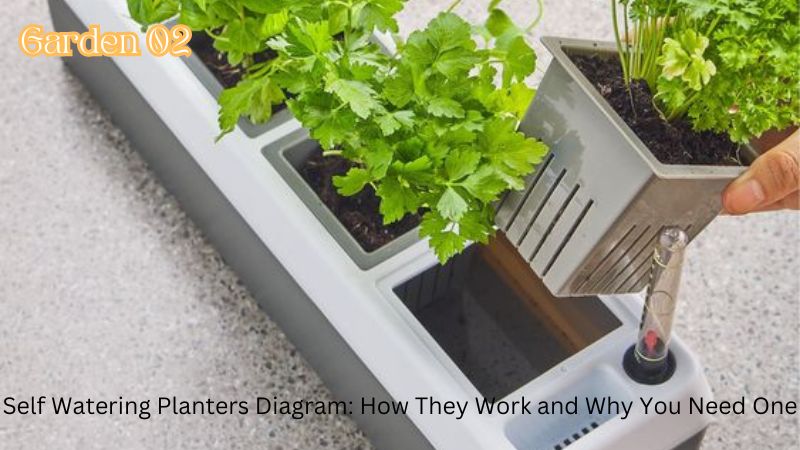
Understanding the science behind self-watering planters can help you appreciate their effectiveness. Here’s a step-by-step breakdown of how they function:
- Filling the Water Reservoir: The first step is to fill the reservoir at the base of the planter. This can be done through the water fill tube or by lifting the planter (if it’s removable) to add water directly into the bottom compartment.
- Capillary Action: Once the reservoir is filled, the wicking mechanism comes into play. Capillary action, a natural process where water moves upward through small spaces (like a sponge soaking up water), allows moisture to be drawn from the reservoir into the soil. This process ensures that water is available to the plant roots without them being submerged.
- Plant Absorption: As the soil absorbs moisture from the wicking material, the roots of the plant access this water. They take in as much water as needed, preventing the plant from being overwatered. The constant supply of moisture at the root level ensures the plant doesn’t dry out.
- Overflow Management: If it rains (in outdoor settings) or if too much water is added to the reservoir, the overflow drain kicks in. Excess water flows out through the drain, preventing the reservoir from flooding and protecting the plant roots from sitting in water, which could lead to root rot.
- Water Monitoring: Depending on the type of self-watering planter, you can use the water level indicator to monitor when the reservoir needs to be refilled. This reduces the need for constant watering, making plant care much easier and more efficient.
4. Benefits of Self-Watering Planters
4.1. Water Conservation
One of the biggest advantages of using a self-watering planter is its ability to conserve water. Since the water is stored in a reservoir and only used as needed, there’s little to no water wastage. Unlike traditional planters where excess water drains out, self-watering planters keep the water available for longer, reducing the need for frequent refills.
4.2. Consistent Moisture Levels
One of the most common mistakes gardeners make is over or under-watering their plants. With a self-watering planter, the plant has constant access to moisture at its roots, which helps to avoid these extremes. The result is a healthy, thriving plant that grows steadily without the stress of fluctuating water levels.
4.3. Ideal for Busy Lifestyles
For people with busy schedules or those who travel often, self-watering planters are a game-changer. You can leave your plants for several days or even weeks, depending on the size of the reservoir, without worrying about their water needs. This makes them an excellent choice for anyone who wants to enjoy the benefits of gardening without the daily responsibility of watering.
4.4. Reduced Risk of Overwatering
Overwatering can lead to root rot, which is a common problem in traditional pots. Self-watering planters eliminate this risk by separating the water reservoir from the planting zone. The plant only takes up as much water as it needs, so there’s no standing water around the roots.
4.5. Better Plant Health and Growth
With a self-watering planter, the plant’s root system can develop more deeply and uniformly, as the roots will naturally seek out the moisture from the wicking mechanism. This leads to healthier plants with stronger root systems, which in turn supports better growth and more vibrant foliage.
5. Ideal Plants for Self-Watering Planters
While many plants benefit from the consistent moisture levels of a self-watering planter, some plants thrive particularly well in this environment:
- Herbs: Basil, mint, parsley, and cilantro are great candidates for self-watering planters, as they need regular moisture but can’t tolerate waterlogged soil.
- Vegetables: Tomatoes, cucumbers, and peppers are often grown in self-watering containers, especially in small spaces like balconies or patios.
- Foliage Plants: Spider plants, peace lilies, and ferns thrive in consistent moisture and are perfect for self-watering setups.
- Tropical Plants: Plants like orchids and bromeliads, which prefer high humidity and regular moisture, also do well in these containers.
6. DIY Self-Watering Planters
If you’re feeling crafty or want to save some money, you can easily make your own self-watering planter using basic materials. Here’s a quick overview of how to create one:
Materials Needed:
- Two containers (one for the plant and one for the reservoir)
- Wicking material (like a cotton rope or piece of fabric)
- A small tube or straw for filling the reservoir
- Soil and plants
Steps:
- Drill a hole in the bottom of the plant container for the wick.
- Insert the wick through the hole, ensuring one end sits in the reservoir container and the other end reaches the soil.
- Fill the top container with soil and plant your seeds or plants.
- Fill the reservoir with water through the tube, and you’re done! The wick will pull water up to the soil as needed.
7. Conclusion
Incorporating a self-watering planter into your gardening routine is a simple yet effective way to maintain healthy plants with minimal effort. With the help of a self-watering planters diagram, you can easily understand how these innovative containers work, offering a consistent and reliable watering solution for both indoor and outdoor plants. Whether you’re a seasoned gardener or just starting out, self-watering planters are a must-have tool for ensuring your plants get the care they need to thrive without the constant hassle of manual watering.
